(typical diode package shown)
Fooling
the map sensor with diodes or bleeds explained.
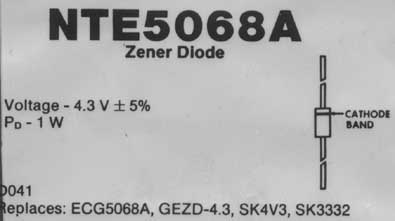
Diode
section, By Gary S. Donovan
Warning! You must have a non-computer controlled wastegate to take advantage of this modification. Any boost over stock levels will also not be seen by the computer and extra fuel will have to be added.
Using a diode is an electrical way of fooling the computer from seeing over a 14 psi of boost. The computer "sees" boost by providing the map sensor with a 5 volt signal and based on the amount of pressure (or vacuum) the sensor is reading returns a voltage between 1. to 5. volts. 2.5v is the center point more or less, any voltage below that is vacuum and any voltage above that is boost.
Now depending on your computer you will need either a 4.3v or a 4.7v zener diode in the 1/2 watt to 1 watt range. Zener diodes work by "dumping" any extra voltage over their rating to ground; thus preventing the computer from seeing over the diodes rated voltage!
(typical diode package shown)
If you have a stock computer, you must use the 4.3v diode. If you use the 4.7v the boost reading the computer still sees is higher than the programmed boost "target" and you will still get overboost shutdown. You must have a MP computer to use the 4.7v diode, they have a higher "target" boost voltage and won't shut down at the 4.7v map sensor reading.
Why not just use the 4.3v diode for everything you say? Well remember we are blinding the computer to what it sees over this target voltage and it won't be supplying extra fuel. The difference between 4.3 and 4.7 might be slight, but it's a little extra fuel and you should take advantage of it if you can.
Now to hook the diode up you will need:
A. a digital volt meter
B. wire strippers or razor knife (be careful)
C. soldering gun/iron and solder
D. electrical tape
There are three wires coming out of your map sensor; sensor ground, 5v in and sensor voltage out (between 1 and 5 volts remember?) With the key on, engine off probe the wires for voltage and mark what you find. The one with NO voltage is ground, and the one with less than 5v is sensor output- we will be using these two wires for our modification.
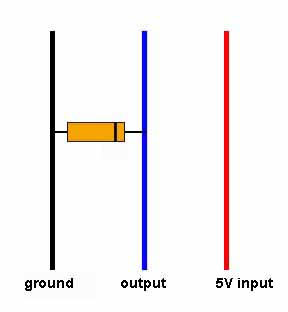
(ignore the colors in this chart- they DO NOT correspond to any cars wiring)
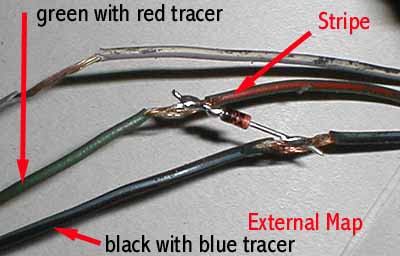
Install the diode as shown in the above diagram, be careful take your time and make sure you don't use to much heat as this will damage the diode and it will not function properly. (A small electronics soldering heatsink isn't a bad idea) its important to note which way the stripe on the diode goes! If you get it backwards, your car will not run correctly!
Tape everything carefully up and you should be good to go!
Too make it even easier for you I took a few pictures!
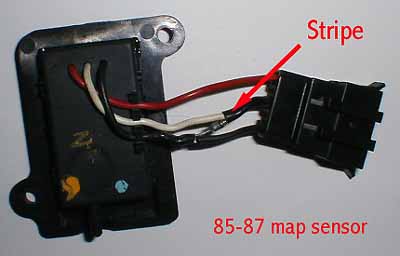
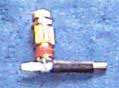
Here is an 85-87 sensor with the diode installed
(87 L-bodies and some 87 P-bodies)
This map sensor diode installation was done
on a 88 CSX-T.
(picture taken before it was taped up of
course)
Bleed section Making a Cut-out Raiser by Gus Mahon
Because of legalities, I can only suggest this as an off-the-road mod. Attempt this at your own risk. It's possible to screw up your engine if you're "all thumbs", and tend to mess up instructions!
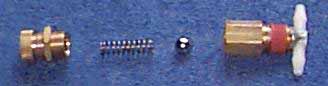
Get a GRAINGER valve, (stock # 5Z763-3) and modify as follows: First take the stock valve (top) and unscrew it. (bottom)
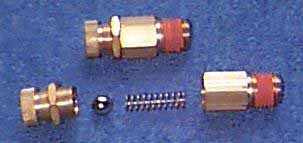
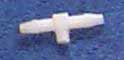
Then get a "tee", and clip off the center barb.
Drill out the hole in the Grainger valve to just the same size as the tee, for a snug fit.
Grind the metal rough around the hole and
clean it with alcohol.
Clean your own skin oil off of the tee with
alcohol. Mix up 2-part epoxy, and glue the tee in.
Let dry overnight.
Assemble the valve with the check ball on the OTHER side of the spring, not the way it came.
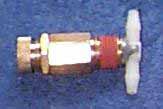
Now take the modified valve...
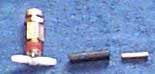
...and put together a short piece of vacuum
line and a restrictor.
WARNING!! The restrictor orifice must
be .029" to .050" A small orifice, like your stock one, will cause the "check engine' light to come on.
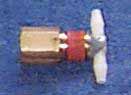
DONE!
INSTALLING the cut out raiser
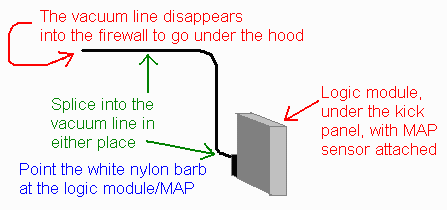
If you have the old style logic-module-in-the-kick panel setup, then you can put this device in the car, or underhood.
In the car: splice into the vacuum line that goes to the MAP sensor - logic module. Pull back the passenger's side footwell carpeting, or remove the kick-panel. Splice in the cut out raiser with the white nylon connector facing the MAP sensor.
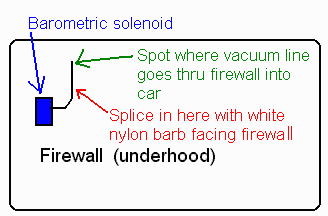
Under the hood: Splice into the vacuum line close to where the vacuum line for the MAP goes through the firewall. Splice into the line near the firewall with the white nipple facing the firewall, and the brass nipple towards the barometric solenoid.
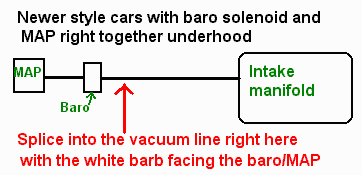
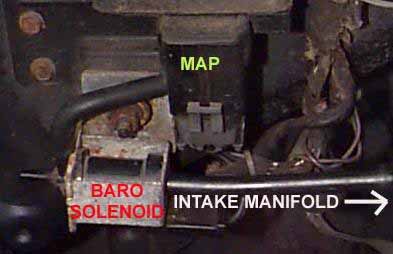
If you have the newer style barometric solenoid/MAP sensor together under the hood, think of the baro/MAP combo as one device. Cut the vacuum line close to the baro/MAP sensor, and splice in the cutout raiser device with the brass nipple towards the intake manifold, and the white nylon nipple towards the MAP sensor/barometric solenoid combination.
Minivan before:
And after:

DIALING IN the installed unit
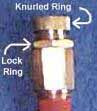
After installation, screw the knurled knob almost all the way in, and the car will still cut out around 15 psi. Loosen the lock-ring, and unscrew the knurled brass knob a half-turn. Re-tighten the lock-ring. After you do this a couple of times, you'll notice that the cut out point gets higher. You can stop at 16, or 18, or whatever you want. BUT, the higher you go, the more fuel you have to add.
Set it as low as you can get away with, because your computer will give you NO MORE fuel past 14.7 psi. The computer will believe that you're never going over 14.7 psi! If you have a rich-lean gauge, back off when you get less than 9 lights on the gauge. ($30 plus "handling" from Summit 1-800-230-3030; Intellitronix air-fuel ratio gauge ) If you have no gauge, run a wire from your O2 sensor wire (the one that reads .1V-.9V at warm idle, bouncing up and down) through the firewall, into the car.
Hook the O2 wire to the red probe of a digital
voltmeter; hook the black probe of the digital voltmeter to a clean ground. When you floor
it, you want to see .87V to .97V. Less than .87V means you're not safely rich. Back off,
and add fuel. you can add fuel by raising the fuel pressure, adding an
extra injector, or switching to slightly larger injectors. If you don't
add any fuel, don't run high boost! I can usually run 15 psi on the
stock setup.
Good luck, be patient, and don't lean out.
TIP: Raise your cut out just
a LITTLE at a time. You don't have to go for it all at once; chances
are, you'll still be here on this planet
tomorrow... Have fun, Gus Mahon
Email Gus at: thomas.mahon@snet.net
OR even better stop by his website:
Hi,
I'm Gus.