![]()
Quantum3D press release 2000-
AAlchemy™ sets the standard for realtime 3D graphics performance. The AAlchemy series delivers full-scene anti-aliasing and scalable graphics performance enabling realtime rendering of complex synthetic environments - rich in cultural features - at sustained frame rates. Featuring technological innovations in full-scene anti-aliasing, texture download performance, texture compression and high resolution, AAlchemy delivers breakthrough performance.
The AA5 Series of graphics accelerators offer the best graphics performance on the market today and are based on 3dfx® VSA-100 graphics technology. The AAlchemy family is compatible with a wide range of leading realtime 3D scene managers and supports leading 3D graphics APIs including SimGL and 3dfx Glide® with realtime 3D file formats such as Open Flight® and Terra Page on a variety of PC operating systems.
The AAlchemy Series of PC IGs is an advanced third generation graphics systems equipped with full-scene, anti-aliasing (FSAA), dual processors and top-of-the-line realtime AA5 series of 3D graphics subsystems. AAlchemy has been designed to provide affordable, extreme-performance, extreme-quality 3D graphics for today's most demanding visual simulation applications. Volume AAlchemy customers are eligible for Quantum3D's long life cycle program.
AAlchemy board configurations:
1) Single Board (SB) comes equipped with one AA5 board (8132 or 8164)
2) Double Board (DB) comes equipped with two AA5 boards, single channel. (8232 or 8264)
3) Dual Channel (DC) comes equipped with two AA5 boards with two independent outputs.
Please note that at some time Quantum3D changed the nomenclature of the boards- Early (2000) documents clearly state 8132, 8164, 8232 and 8264 configurations while later ones (2002) state 8232SB, 8264SB, 8264DC, 8464DB.

2000 AA5 AAlchemy configuration chart.

2002 AA5 AAlchemy configuration chart.
There are two basic AA5 boards which use the same PCB (8132 and 8164) and early and late revisions (2.7 volt core voltage or 2.9 volt core voltage) The boards then can be configured for single board or dual board operation. An early 2.7 volt board can be run with the later 2.9 volt power supply with no ill effects.
How to identify your board configuration-
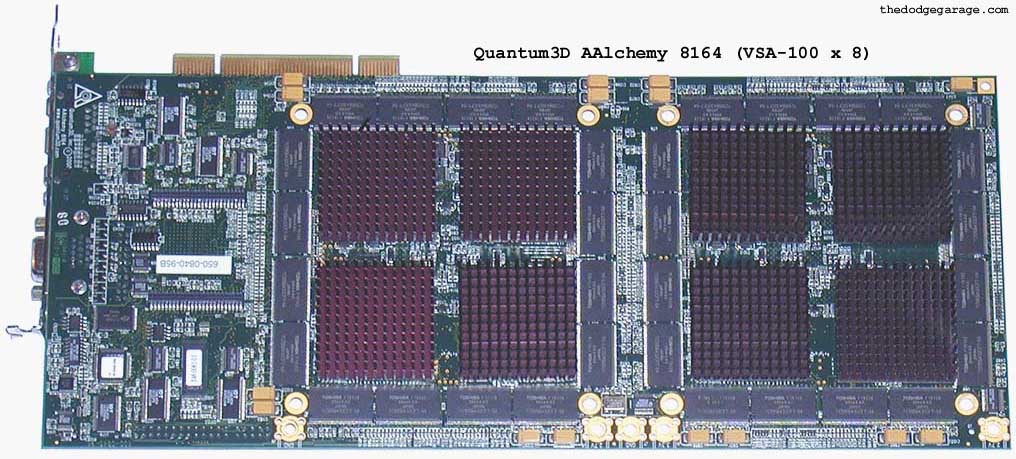
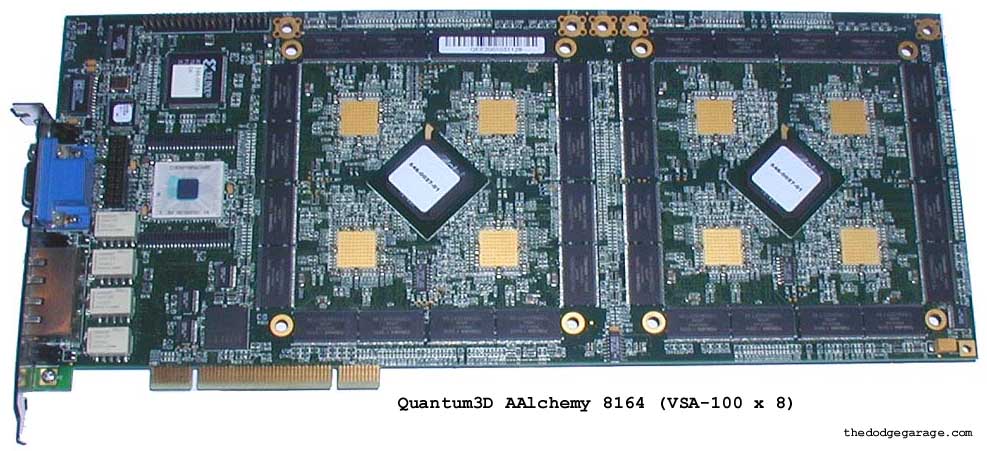
Typical 8164 AAlchemy (AA5) board, front view, note the fully populated ram positions. (512MB)
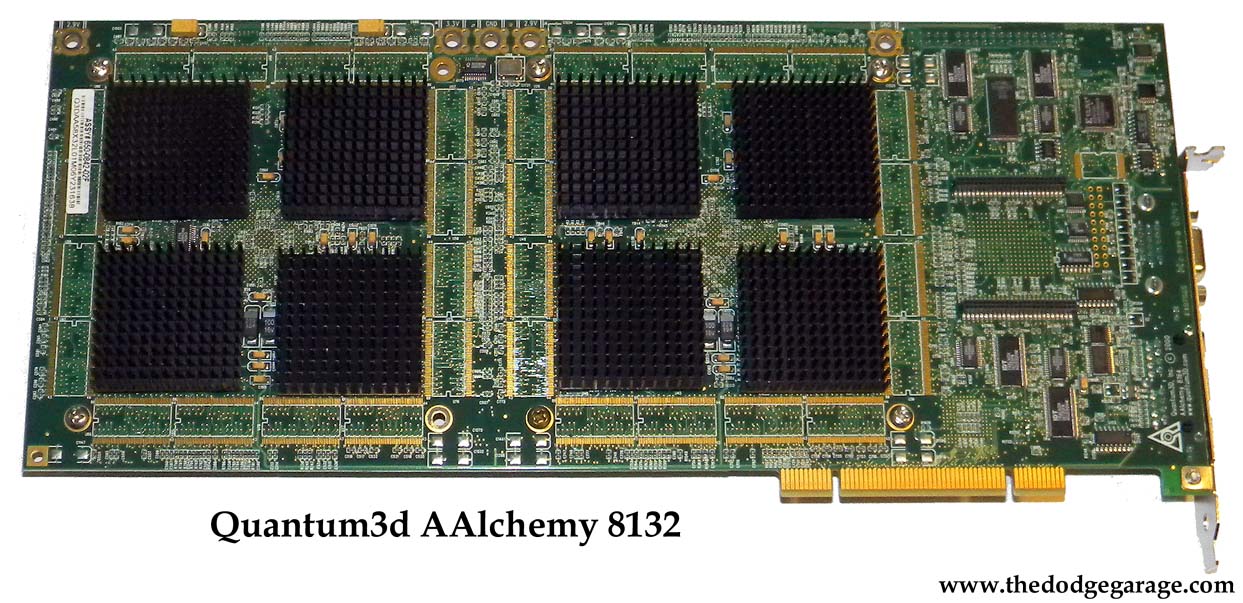
8132 boards use the same PCB (and hence carry the same "8164" marking but only has half the ram. (256MB)
Typical 8164 & 8132 AAlchemy (AA5) rear.
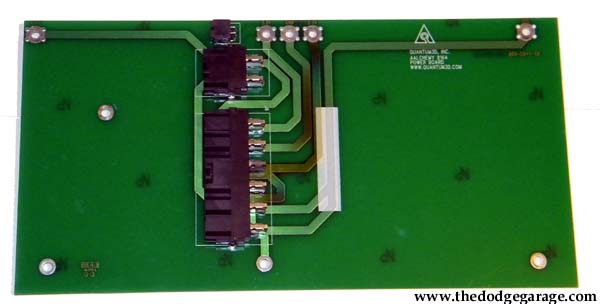
Typical power supply board.
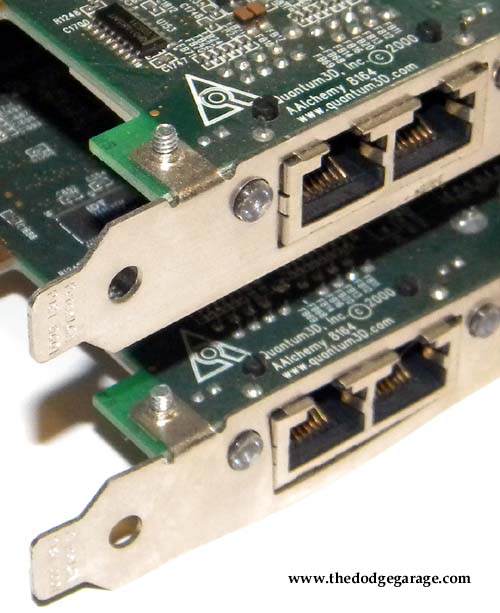
Dual board setup with close up of PCB markings.
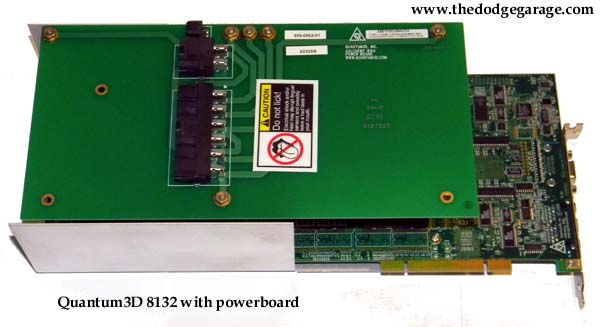
8132 Single board with power board mounted. Yes, that is an official Quantum3D decal that states "DO NOT LICK"
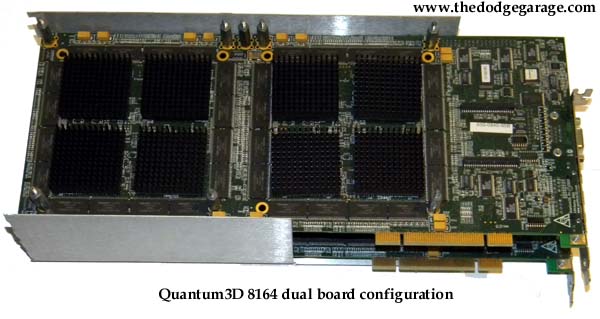
Early 8164 Dual Board setup.
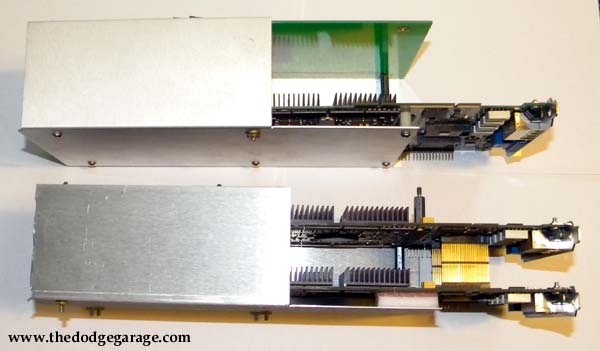
Side view of the two board setups.

Close up of bridge pins connecting two boards for a DB (double board) configuration.
AAlchemy power supply
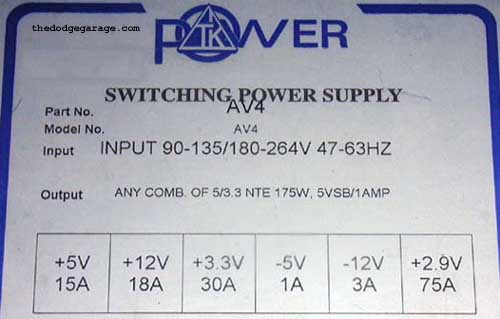
The AAlchemy power supply is a custom unit manufactured for Quantum3D by TK Power in California who is no longer in business. I purchased one of the last units they had several years ago and the price was $450 which was a bargain as Quantum3D refused to sell me one. Hell they thought I was crazy as hell trying to get an AAlchemy board running just so I could test video games. It is pretty much two full size power supplies in one case as an AA5 assembly can draw as much as 75 amps of power!
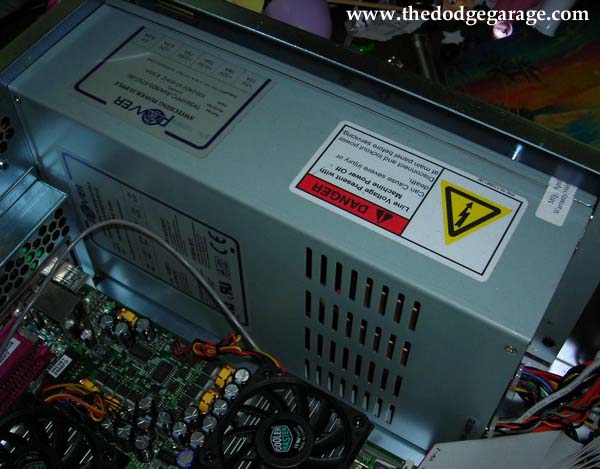
Shown installed! As you can see the thing is huge.
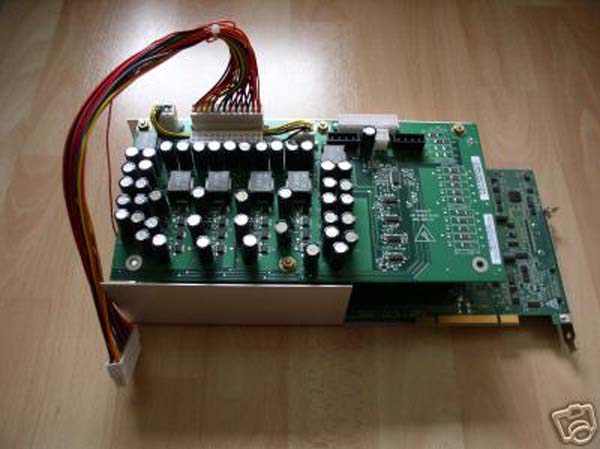
Quantum3D did make a power supply board that tapped into the ATX connector and had Molex plugs but outside of a single example on Ebay have not seen one since.
Make your own AAlchemy power supply. (Löschzwerg) January 2009
Here is Löschzwerg's instructions on how to build an AAlchemy AA5 PSU by yourself. With this PSU you are able to power your AA5 card just by connecting a molex plug from your normal PC PSU. No external PSU is needed! This is his first version, it is not perfect! He will do a reworked PSU sometime in the future and I'll post the information as it arrives.
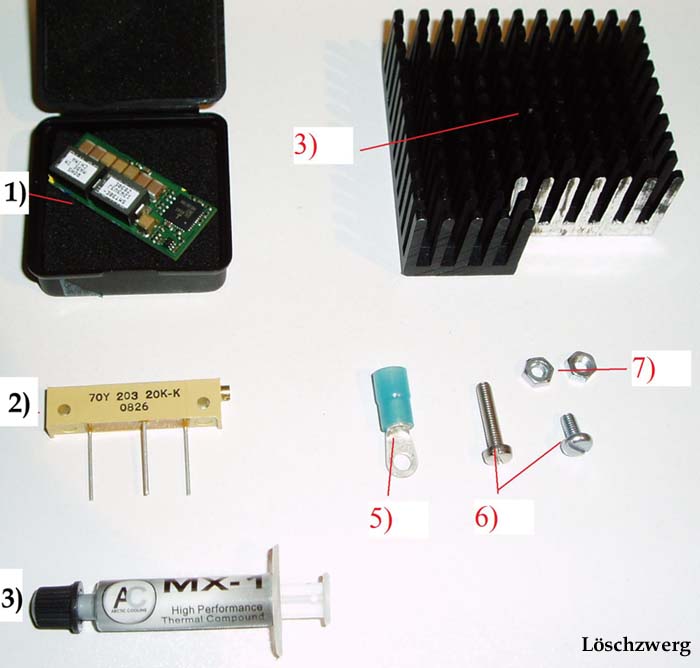
Parts you will need:
1) DC/DC-Converter Artesyn
SMT30E 12W3V3J (30A output current)
2) a rheostat (regulateable resistor) with 20k ohm
3) an old heatsink where you can cut of a piece
4) thermal compound or better thermal glue
5) several cable shoes which fot to the AA5 board
6) several screws which fit to the AA5 board
7) several nuts matching to the screws
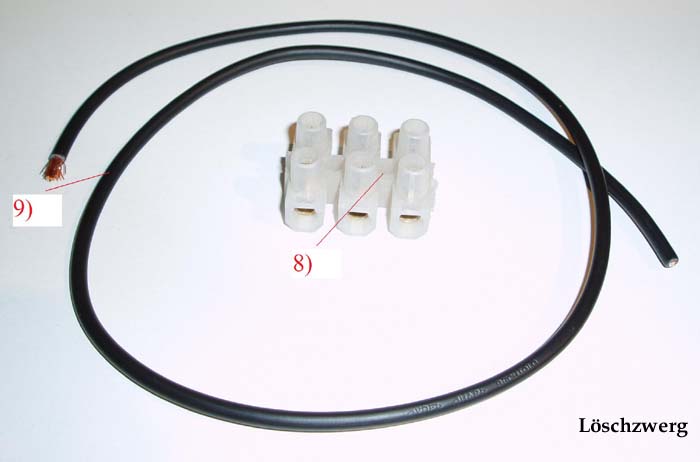
8 ) a chocolate block
(wiring strip or terminal block here in the USA) with several rows/connectors
(at least 5)
9) a long piece of isolated, fine-wired copper cable with 2,5mm²
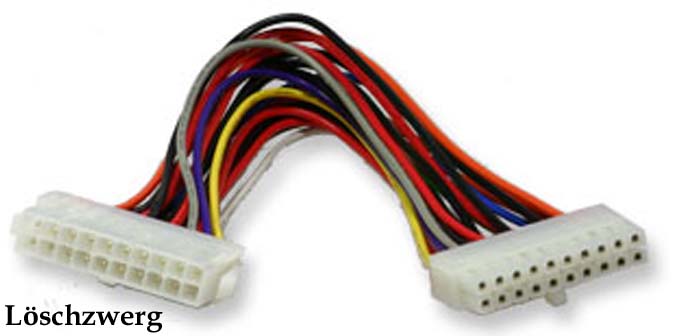
10) ATX main connector extension
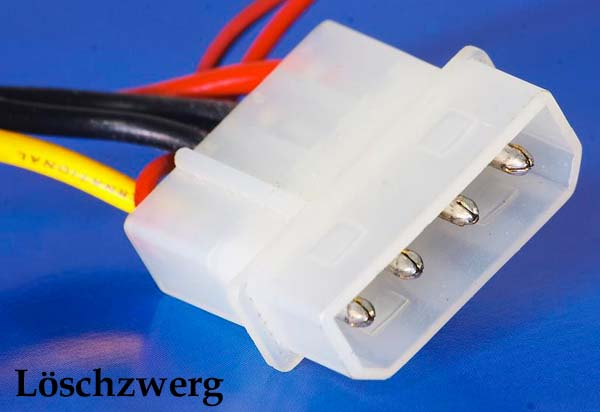
11) a molex connector with wires; we need the male part so you can connect it with your pc PSU
Tools you will need:
Wire strippers and wire crimpers
Side cutters and screwdriver
Quality digital mult-imeter
A typical 15-30 watt soldering iron.
Skills
you should have:
- at least some experience in soldering small parts
- you should know the basics of electrical engineering
- you also should know how to use a multi-meter
Where do i get my
equipment from?
Well all components and tools can be bought in an electronics specialist shop,
the main problem
is getting a suitable DC/DC-Converter. Mine is from the manufacturer Artesyn
(SMT30E 12W3V3J)
and i ordered it from RS Components Germany. RS Components is a worldwide
electronics seller,
so there is a great possibility that you can order this converter directly from
your home country.
These two sellers provide suitable dc/dc-converter:
- RS Components (worldwide)
- Mouser Electronics (US)
What can i do if i
can't order exactly this converter?
Look for a converter with the following specifications:
- Input from the converter should be good with 12V
- Output voltage should be adjustable to 2,7 - 3,0V
- Output current should be at least 25/26A, more is better
=> get the application note of your
dc/dc-converter!!!
=> the application note shows how the converter works
=> it shows all necessary spots and what you have to do to regulate your
output voltage
=> in most cases the output voltage is regulated via resistors, a calculation
in the note shows how much ohm a resistor needs to get your specific output
voltage
Read the application
note and identify the needed spots of you converter:
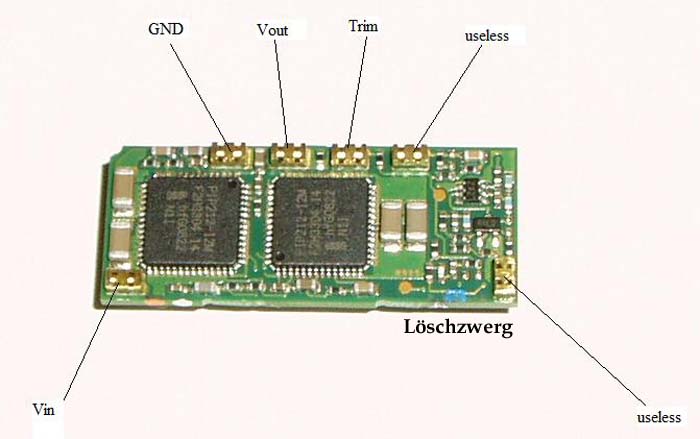
GND -> common return path for electric
current; connect the black cabel from your molex with this spot; connect one pin
of the rheostat with this spot; connect the AA5 GND contacts to this spot
Vin -> connect the yellow cable (12v) from your molex with it
Trim -> this spot is used to trim the output voltage; connect the sliding
contact from rheostat with it
Vout -> your 2,9V output for the AA5 card
Main schematic:
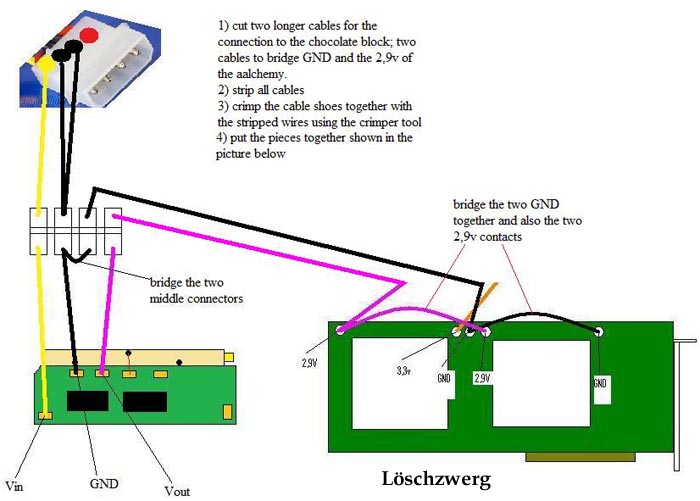
This schematic is not conform to the rules of electrical engineering, but this
way everyone understands it
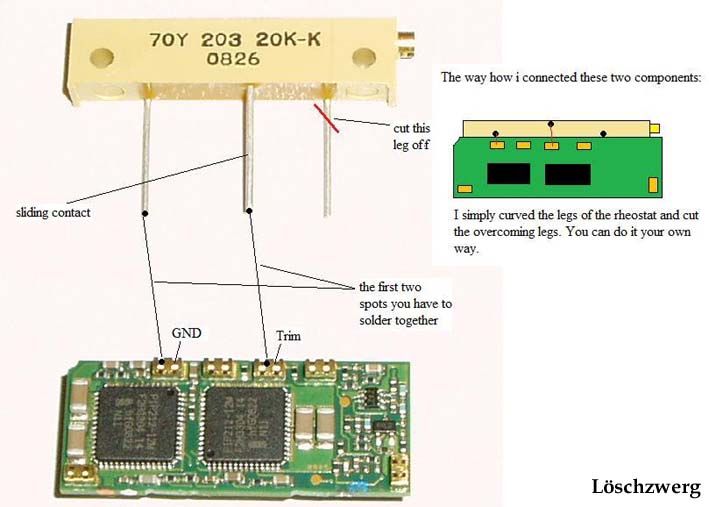
First step ->
connect the rheostat with the converter:
You have to connect one leg of the rheostat with GND (converter) and the sliding
contact with the "Trim"-contact (converter).
Second step ->
connect the chocolate block with the converter:
Now you will see how good your soldering skills are
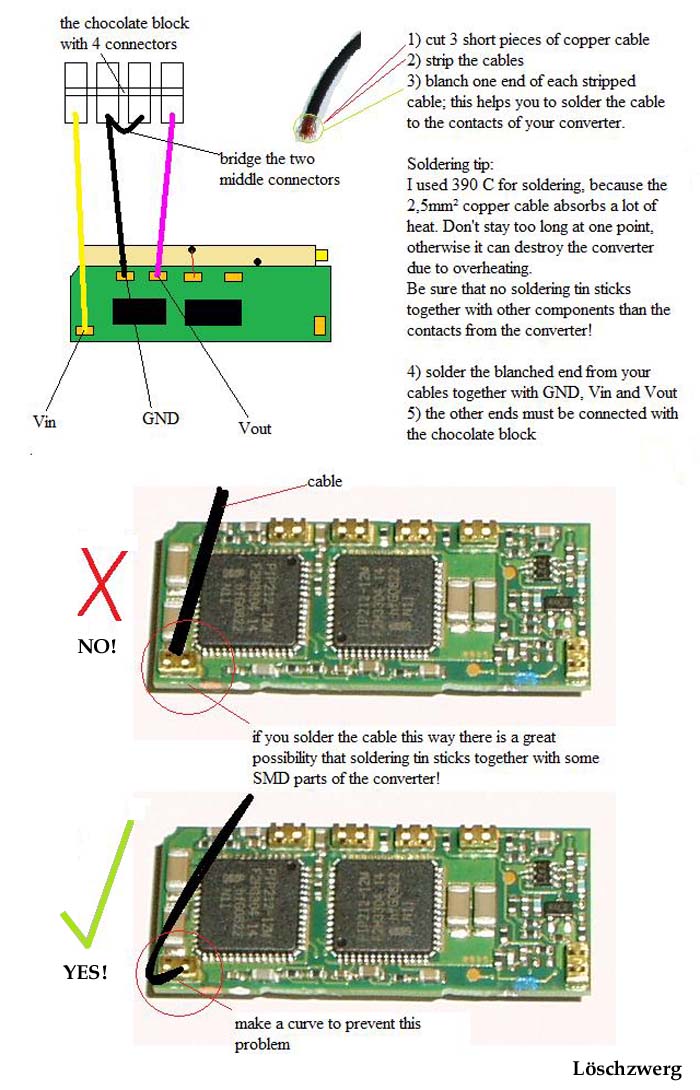
Third step ->
connect the molex to the chocolate block:
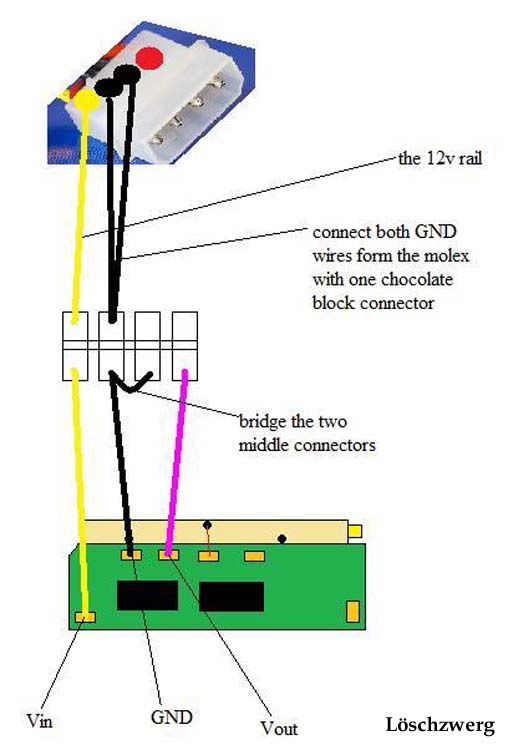
After this let's do some tests!
Fourth step ->
Let's do some tests and configuration!

Fifth step ->
connect the PSU to the Aalchemy:
In this step we will connect the PSU with the Aalchemy.
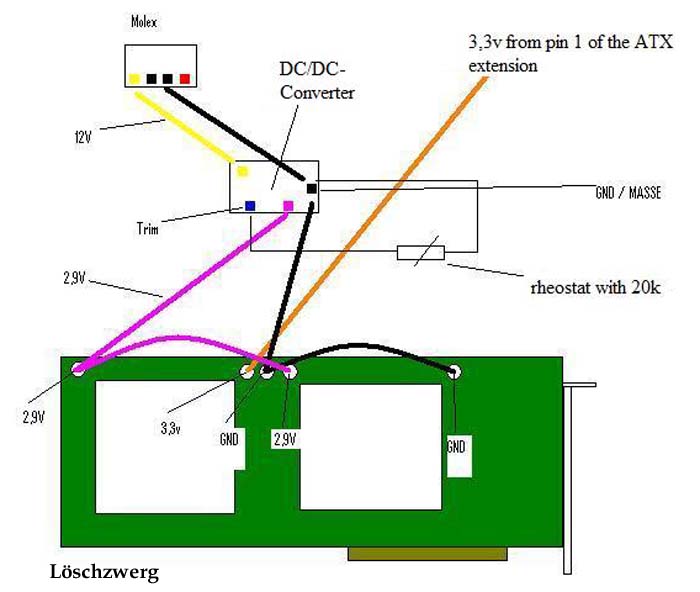
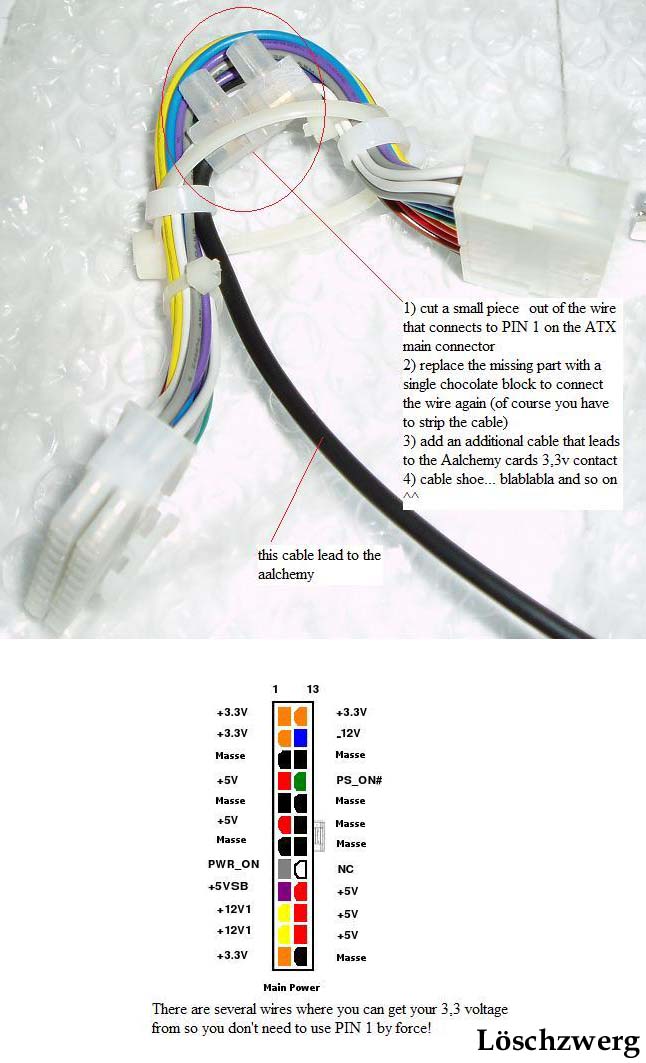
Sixth step -> get
the 3,3v from the ATX extension:
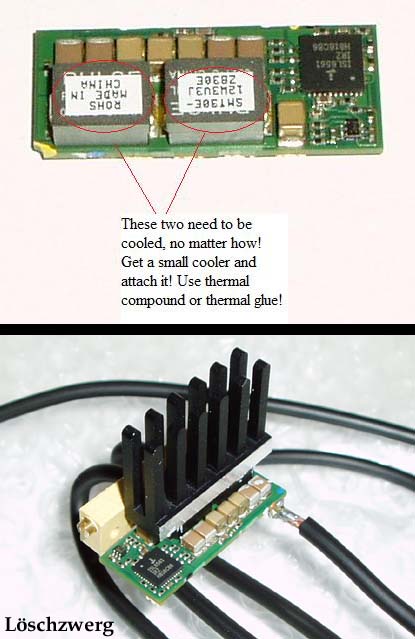
Final work:
The converter gets really hot, so it needs to be cooled down! Therefore use a
heatsink
and attach it to the coils. I cut a piece out of an old pentium alu cooler, but
you could
also use two zalman ram coolers used for modern graphic cards.
Installation:
Install the card, the PSU and the modified ATX extension into your PC.
Before you power on your PC make sure you apply the multimeter to the
card so you can control the voltage during startup.
Due to the load from the AAlchemy the voltage may drop a little bit. If the
voltage
get's under 2,7v you should adjust the PSU.
There should be a good airflow in the tower, the card and the PSU need it.
Final words:
Well, this is the way i did my first PSU for the AA5... it's far away from being
perfect and i will build a reworked version when i did some benchmarks with my
card.
This How-to is an example how it could be done! You are free to revise it
There might be many misspelling in this How-to... don't be too hard on me, i
know my english is not the best
I have written and painted this all by myself!
I hope i could help many people ou there having problems to get their AAlchemys
to work.
Have fun
Löschzwerg
Drivers & Documents-
Download the Quantum3D NT4 and Windows 2000 drivers for AAlchemy here and the patch for running them under XP here.
AAlchemy manuals can be found here.
Quantum3D AAlchemy spec sheet can be found here.
Quantum3D AAlchemy End Of Service bulletin here.
Game FAQ-

AAlchemy will run most OpenGL games (GLQuake, Quake II, Jedi Kight Outcast & Serious Sam) with some exceptions- The Dual Board Single Channel setup won't run any games I have tested but the single boards work just fine. Since there is no Direct X driver available from Quantum3D, no Direct X titles will run either.. AAlchemy was primarily designed to run simulation software with API's like SimGL, 3dfx Glide & OpenGVS.
m14radu over at the V5-6000 forum did some testing with an OpenGL tool and posted the following results:
OpenGL 1.1 - Suported 100%
OpenGL 1.2 - Unsuported
OpenGL 1.3 - Suported 33%
OpenGL 1.4 - Suported 6%
Update 3/18/2012 from V5-6000/AAlchemy board
Working:
Quake3 -> 3dfxOGL.dll (OpenGL ICD) -> working without any problem
Operation Flashpoint -> default Glide3 -> works quite well, some
minor graphic glitches
Unreal Tournament -> q3dsglg3.dll (SimGL) -> runs very well in
OpenGL mode, some texture issues
Serious Sam First Encounter -> 3dfxOGL.dll (OpenGL ICD) -> runs
fast and does look good, problems with too high special effects settings
Doom³ E3 Alpha -> 3dfxOGL.dll (OpenGL ICD) -> does work quite well
and with playable frame rates; due to the early development state it has
performance drops and many bugs; no extended graphics are displayed due to
hardware limitations
Turok 2 -> native Glide 3 -> works fast, but it's not possible to
change screen resolution.
Rune -> q3dsglg3.dll (SimGL) -> runs very good in OpenGL! It uses a
later version of the UT-Engine and does have no graphical issues.
Nexuiz -> 3dfxOGL.dll (OpenGL ICD) and q3dsglg3.dll (SimGL) ->
works with both drivers; the SimGL driver is far not as fast as the ICD but has
better graphics; when using 1280x1024 heavy performance impact when using 32Bit
colors!!! 16Bit quite not look as good as 32Bit but is fast. Game is based on
Quake 1 engine!
Does not run or with heavy issues:
Far Cry -> 3dfxOGL.dll (OpenGL ICD) -> starts in OpenGL mode with manually
edited config file; the options menu shows the character rotating; crashes after
starting the game
Doom³ -> tested with 3dfxOGL.dll and q3dsglg3.dll -> always
crashes and shows OpenGL extensions error
Descent 3 -> q3dsglg3.dll (SimGL) -> runs with OpenGL; crashes when
doing to much in the options menu; heavy graphical issues... it's unplayable
Prey -> tested with 3dfxOGL.dll and q3dsglg3.dll -> same errors as
with final Doom 3... the engine stops with opengl extension errors. We
need better OpenGL support!!!
Games not tested but that should work:
- Jedi Outcast
- Jedi Academy
- Return to Castle Wolfenstein
- Hitman - Codename 47
- Messiah (Glide3)
- DeusEx
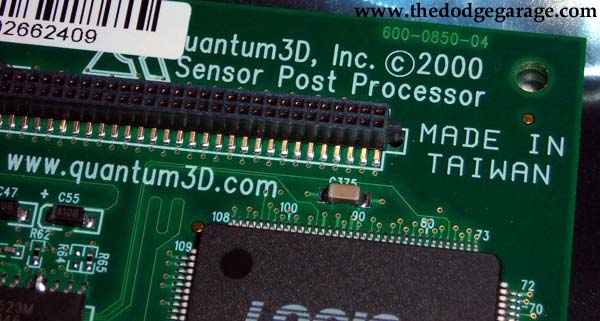
nVSensor Post Processor board
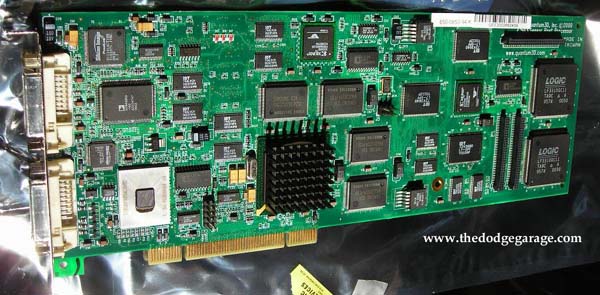
Shown above is a Quantum3D nVSENSOR board, which is amusing since under the heatsink is a Voodoo 3 chip! This add on board is bridged to the back of an AAchemy to provide DVI output with extra environmental effects like fog and snow. It attaches to the backside of an AA5 board hence its inclusion to this page.
Here is a snippet- For IR and NVG applications, AAlchemy is available with nVSensor, Quantum3D's realtime hardware sensor post processing option that enables AAlchemy to host high-fidelity sensor simulations without the performance degradation associated with software-only approaches. With its 10-bit per pixel DAC and optimized support for MultiGen-Paradigm Vega™, SensorWorks™, SensorVision™ and viXsen™, nVSensor adds sensor effects including AC Coupling, AGC, Blur, Detail Peaking, Gain and Bias, OTW/Sensor Multiplexing, Noise, Polarity Inversion (white-hot / black-hot), Reticles and Symbology, and Tint to realtime rendered IR or NVG scenes with DVI and analog RGB output.
![]()