Intercooling the log manifold 84-87 Turbo
I
Not everyone has the skill, parts or desire to swap their 84-87 log intake manifold Turbo I vehicle over to the newer style intake. For some it's a daunting task or in the case of the '84 cars the most difficult due to wiring unique to that model year! So what do you do if you want some spiffy performance increases but don't want to go the whole nine yards installing the 87-91 Turbo II style setup and electronics?
Intercool the log of course.
This won't get you the maximum hp available for your 2.2 (the log intake manifold is notoriously poor flowing compared to the later intakes) but you will be able to run more boost without detonation and make more power all the while enjoying the benefits of doing so with less octane! This isn't a step by step guide but rather a collection of tips, suggestions, photos and commentary by people who have gone this route before.
Some tips-
1) From the throttle body to the intake manifold your under vacuum or boost (including the intercooler) so you cannot use rubber hose alone to intercool the car, it will suck flat in a heartbeat when the throttle is closed. Sections of steel or aluminum pipe joined with short sections of reinforced rubber hose is best.
2) Double clamp ALL the hose sections- Due to the location of the Throttle Body at the beginning of the intake tract if you lose a hose connection behind the throttle body you could have an uncontrolled Wide Open Throttle event occur. Not good for the engine or anything the car is pointing at should this happen, so make sure all your connections are excellent.
There are many different ways to install an intercooler using the log manifold- Your imagination is the only limit.
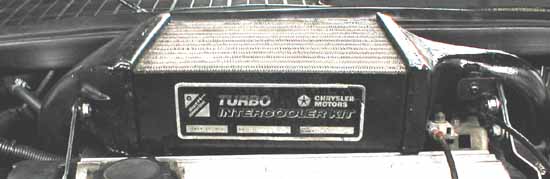
Mopar Performance and Spearco use to offer kits
It wasn't a bad little kit except for it placed the intercooler directly over the engine which meant you had to cut a hole in your hood. Another issue was the fact that with the stock intake manifold cylinders 3 & 4 ran 10% richer because they received more air due to the manifolds design (or lack of) With MP intercooler kit now 1 & 2 ran lean because now air entered the motor on the passenger side of the engine! The quick and easy fix was to swap the injector pins at the injector harness plug and everything was golden. (early 2.2 engines fire injectors in pairs, 1 & 2 and 3 & 4, so all you had to do was swap 2 wires) Mopar Performance used to sell a computer for this intercooler which raised the boost a bit and swapped the injector bias in software as opposed to playing with the harness at the injectors. You can find this kit on ebay time to time.
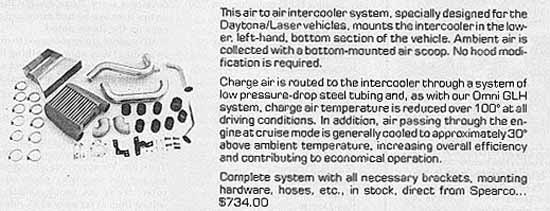
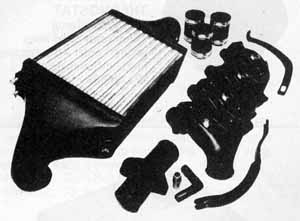
Spearco had a kit that located the intercooler above the transaxle with a scoop to direct air from under the car.
You had to send them an intake manifold, they cut the 90 degree bend off the end and welded it back on between cylinders number three and four then the open end of the intake was welded shut.
Another view, these are seen on ebay time to time as well.
Callaway (yes of Callaway twin turbo Corvette fame) also offered a kit for our cars but I have never physically seen one. I have seen the sales ad on a trip to Callaway one day, a representative was nice enough to show it to me from the files. It used a remote mounted intercooler with the same thing done to the intake that Spearco did.
Dan Culkin
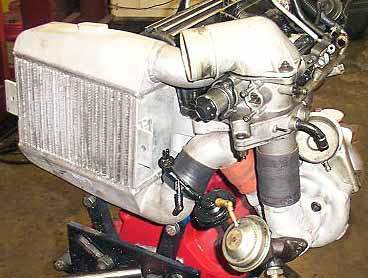
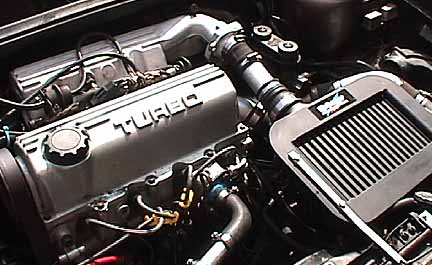
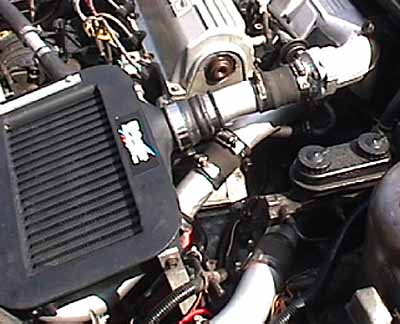
The project - intercool while using original intake manifold, exhaust manifold, turbo, and electronics (original throttle body required). How I did it: There were two main challenges - how could I modify the intake manifold in order to accept a blow through type design, and being that I wanted to use the original throttle body, where to put it and how to mount it. To the machine shop. Using a log manifold, I used a band saw to cut off that restrictive elbow that diverts air from the turbo into the intake. I then used the original throttle body mounting plate and pipe (originally bolted to the intake manifold and rubber hosed to the turbo) and figured I would weld that directly onto the cut intake manifold. I carefully measured for clearance with the brake master cylinder, then measured the head for bolt clearance for the throttle body itself, and everything would fit with about 2 inches to spare! Machinist Paul Baker welded it together for me, and dremeled the inner junction smooth.
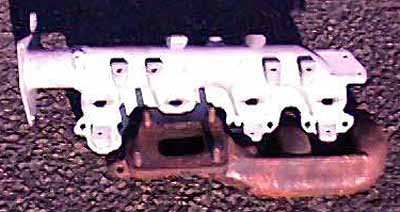
For that favor, I've named the manifold design the "Baker manifold." The assembly is like this: The intake manifold is mounted on the head, and the throttle body is mounted sideways, allowing use of the original throttle cable, and TPS/AIS wiring. The turbo is unchanged and mounted in it's original position. The original throttle body came with a heavy plastic cap to divert air from the original air box into the throttle body. We'll use that to divert the air from the intercooler! There was another issue to be dealt with yet. I wanted to use a big intercooler, but did not want to deal with mounting it in the nose and creating alot of custom intercooler tubing.
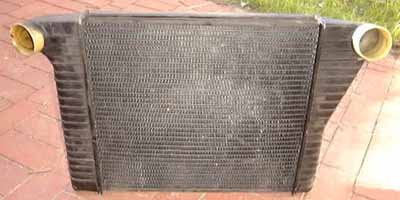
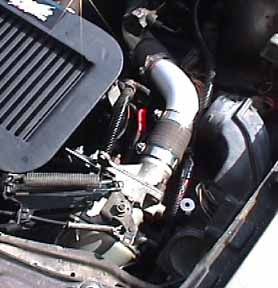
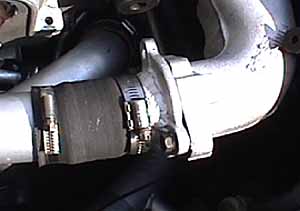
I had a big intercooler from a Volvo 740, which was about the same size as the original non-intercooled Daytona radiator. So it made sense to mount it in place of the radiator. Great! But... I need a radiator! It happens to turn out (lucky me) that the cores of the Volvo intercooler and a radiator from an 87 Dodge Omni automatic are the same size. I measured widths, and figured that there was enough room between the engine and front clip that I could piggy back the Omni radiator behind the intercooler. Back to the machine shop ... made some custom brackets, bolted the intercooler/radiator together, and voila! I had my own custom int/rad assembly! It was so convenient that I was able to use the original mounting brackets from the radiator! No drilling, nothing funny... The inlet and outlet of the intercooler were on the top at either side, such that the one on the drivers side was pointing at the battery. Finally my excuse to buy a smaller battery. I moved the power module back by one bolt hole (only one holding it in now) and joined it to the air hole using a piece of the original power module to airbox tube. A skinny battery is placed in that front corner. Still working on more secure brackets for that, bungy cords don't go over well at the race track... Now for the connecting up the int/rad. I cut shorter a Daytona upper hose, perfect. I cut short an Omni lower radiator hose. Perfect. Turbo to intercooler - using rubber sewage elbows and exhaust pipe, I go from the turbo outlet up, around the back of the engine bay, between the timing belt and shock tower, and into the intercooler. I should mention that I've been warned by many that those type of rubber hoses will melt, though up to 14psi I've had no problems yet. (After this was written Dan ran into problems, trust me, as they get hot they disintegrate) For the intercooler to the throttle body, feeling nostalgic again, I decided to use (and they happened to fit perfectly) two original airbox to throttle body hoses. Wonderful! I fit a Daytona blow off valve near the solenoids, and (not shown) T'd a 3/4" swing check valve (one way valve) from Mcmaster Carr (p/n 45275K53) pointing in in between the intercooler and throttle body. Why the one way valve? When you hit the throttle from a non-boost position, for up to 2 seconds (depending on load) there is vacuum in that part of the air delivery system. This is because air must come in through the turbo compressor (which is spinning slower that the air trying to rush past it) through the intercooler and finally to the throttle body. Less air into the intake, less exhaust trying to get that turbo spinning, which is holding back air to begin with!!! My testing has proved that adding the one way valve gives better throttle response AND reduces turbo spool time. No, this valve will change nothing of the power output of the engine, just makes it a little more responsive in many situations. So I put it all together, and by golly it worked!!! I drove for several weeks on minimum boost setting (9 psi - I'm using an actuator from an 84 Laser XE Turbo 1 with a tight spring). Response is wonderful, the power increase is astounding. I highly recommend intercooling to anyone serious about going fast in a turbo car. One problem arose - the plugs on cylinders #1 and #2 read lean. It turns out that 1986 T1 electronics were programmed to lean #1 and #2 compared to #3 and #4 to compensate for a poor flowing intake manifold. I guess I took care of that! I learned from the mysterious 5DIGITS that a rough average of the difference in duty cycle for that injector circuit was about 8% less that the 3-4 circuit. Stock T2 injectors happen to flow something like 10% more that stock T1 injectors. Yup, I installed T2 injectors on cylinders #1 and #2, and left #3 and #4 stock. I drove around for a few more weeks at 9psi, and checked the plugs. Perfect all around! I promptly raised the boost to about 12-13psi. Wow! My big problem is this - I love the feeling of acceleration. I also like to drive somewhere near the speed limit. But with this car I can only accelerate for too short of a time before the speedometer flies past 60, 65, 70, 75, 80, ...!!!!!!!!!!!!
I'll drive for another few weeks at 12-13 psi, then install a cutout raiser with a safety switch, and maybe inch up to 15-16 psi for a while. If necessary, I have a pressure switch and VW cold start injector poised on my garage shelf.
Racing Tracy Doyle's hybrid setup
This is my 85 Chrysler Town & Country Woody Wagon, it's only the fifth or sixth one that I've ever seen. AND the PERFECT SLEEPER!! I found it at a cheesy car lot, it had a bad turbo and head gasket, sat for a year, so I was able to get it for DIRT!!
Body and interior were in good condition, and it just so happened I had another 85 T1 engine setting in the garage, that has run a 13.10 @ 107mph quarter mile in a friend's Shelby Charger!! This motor was dropped into place...
I wanted to try some new ideas on this car, to see how far I could "push the envelope" on re-engineering and design, and seek even more power from the draw-through intake system.
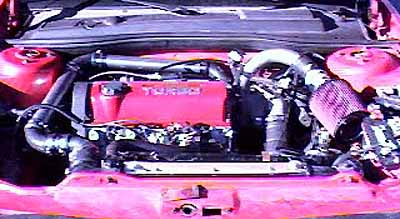
I had a bunch of parts, so I used an 88 blow-thru intake manifold instead of the early style "log" manifold, and an intercooler from a 89 turbo T-Bird, mounted under the hood, for maximum stealth...Duct work will send air from the RH side hi beam headlight to under the intercooler, the top of the IC is recessed about 1/2" and will make a great ice cube tray on race day.
Perhaps the most unique thing on the car is the intake system, the "Repo Man Intake Snake" The throttle body is mounted between the IC and the fender on it's side, where the battery used to be. It is connected to the turbo with 2" aluminum pipe with gentle mandrel bends that was from a junkyard Saab 9000. A T2 style turbo intake was made by cutting the mounting flange and the hose spigot off the stock 90* intake elbow and welding them together.
The thing about the draw through system that always really bugged me is the 90* elbow that connects the TB to the turbo. It has several bad aerodynamic features, most of all the 90* bend, and let's not forget the blunt 3/16" sand cast ends that the incoming air crashes into! NOT very aero!!
SO - I designed the "Repo Man Intake Snake" to eliminate the 90* bend, and smooth out the intake airflow. I had to add about 18" to the 5 wires that go to the TB for the AIS and TPS unit, no big deal, and the stock throttle cable works fine. Testing is now underway, and this elimination of the 90* bend would be a good mod for any early style T1, weather it's intercooled or not.
Check out Tracys' page at the Ohio Valley Chapter of SDAC