Conversion page from 85-87 Turbo
I to Turbo II
Yes I've done it before and it's the best way to make power if your still tooling along with and want to get rid of the log intake manifold. Why am I not covering the 1984 cars? Electrically they are a nightmare compared to 85-87 vintage vehicles, impossible to do the electrical part of the conversion unless a 85 wiring harness is swapped in.
This procedure isn't making your car a true Turbo II car with the stouter internals and gearbox but will get you into the intercooled swing of things. This is very similar to what Shelby did with the GLHS, CSX and Lancers.
Chris's Shelby Site has an TII conversion article as does Dylan from http://turboelectrics.com. I'd read them as well just in case I missed anything or they did something different.
Two parts to this process- The mechanical part and the electrical part, we will cover them separately.
PLEASE READ THE COMPLETE PAGE BEFORE PROCEEDING. IF YOU HAVE ANY QUESTIONS OR SEE SOMETHING OMITTED PLEASE EMAIL ME BEFORE ATTEMPTING THIS.
Parts needed:
88-92 Turbo intake manifold
with fuel rail, regulator & throttle body (With AIS &TPS).
(Or 87 T-II intake, rail & regulator, much harder to find and work around)
NOTE: you will need the correct length bolts for the intake, either from a hardware store or a core engine.
33 pph injectors from T-II, 2.5 T-I or T-III engine.
87-89 Garrett turbo or a 88-92 mitsu turbo (not recommended) or mod your current turbo to work.
Intake gasket, valve cover end seals, 005 MP headgasket & RTV.
Logic Module, either 86-87
GLHS or 87 T-II Daytona/CSX-
See electrical section for details on which unit is correct for your
application.
2 small rolls of different color wire, about 16 gauge. (I'd use black & purple)
Extra Logic Module pins with about 4-6 inches of wire (LM plug from junkyard car will do)
4 wire AIS and 3 wire TPS connectors from
88-93 FWD Mopar with 2.2/2.5/3.0 engine.
(87 conversions will only need the AIS plug, your already using the newer TPS
connector)
Throttle cable and TB bracket from 88-92 turbo, 87 T-II is unique setup which also can be used, 3.0 V6 looks to be usable as well but cable may or may not be shorter.
Intercooler & radiator setup from 87-89 TII car- All hoses, air cleaner box & bracket, don't forget the lower rad hose is unique too. If going with a different intercooler I'm sure you know you will have to fabricate your own hoses and connections from exhaust pipe and truck radiator hose.
Parts that might be needed:
1988-92 valve cover.
Replacement headbolts.
88-92 PCV connector & pipe.
1987-1992 exhaust manifold.
If converting a 1985 car, you will need a 86-92 turbo distributor.
The mechanical part-
1) Pull the head off the motor and strip off the intake, exhaust manifold & turbo.
You may wish to review & do the wiring part when the head is off, it maybe easier at this point depending on where you run the wires.
2) Swap fuel injector wiring harness to the new intake and install the intake on the head. (see notes below)
If using a 87-89 T-II intake the charge air sensor will already be in place. OR 88-92 TI intake there will be no charge air hole, you will have to drill and tap hole for sensor before installing (make sure you clean all the chips out!) OR Just plug the sensor in and tie wrap the sensor to the harness. Been done before and no harm is done.
3) Install exhaust manifold (see notes below)

If using a 1987-1992 manifold you are all set. If using a 84-86 vintage exhaust manifold you will have to grind a notch in the flange where the turbo bolts to the manifold to clear the number three intake runner or replace the manifold with a 87-92 unit.
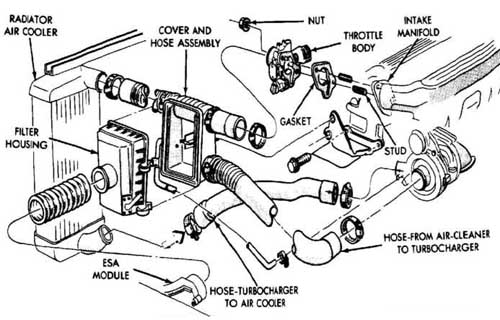
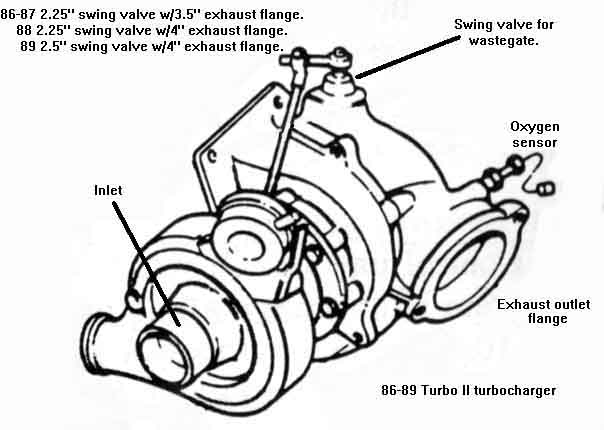
4) Install turbocharger and related oil & coolant lines. (see notes below)
(click for larger image)
Long subject- If using your current turbo and modifying it OR a 1987 TII turbo you don't have to worry about the exhaust pipe. If using a 88 turbo you will have to change the upper flange or the whole pipe because of a bolt pattern change OR if your using a 89-92 turbo you will have to change the pipe and flange because Chrysler increased the pipe size in 89 to 2.5 inches. The oil lines are pretty much the same but the coolant lines are a little different from Garrett to mitsu turbos.. I find with a little tweaking and slight bending you can get your current lines to work. At worst case you will have to order a upper coolant line for whatever car the turbo your using came from- prices range from $30-$80 depending on the application.
NOTE: If your going to use a mitsu turbo the 85-86 "heavyweight" starter is in the way and it wont fit! You will have to upgrade to a 88-92 "lightweight" starter (and remember to reinstall the heat shield, it's important!)
5) Reinstall your head & valve cover.
You can reuse your old valve cover OR install a 88-92 valve cover at this point- The 2 differences are that the 89-92 V.C. has a straight piece sticking out of the back of the cover (which can be transferred to the old valve cover) instead of a 90 degree (which I think may be in the way of the fuel rail) The other difference is the 89-92 valve cover has a 1 piece "o-ring" that uses no RTV and is very resistant to oil leaks and can be reused a few times. (Make sure you get the correct valve covers bolts if using the later model cover, they are longer.
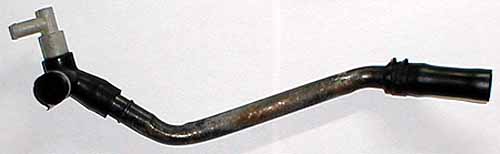
The PCV hookup grommet attaches to the back of the valve cover, the PCV valve plugs into that and there is a metal "pipe" that runs down to the airbox for draining.
Now is a good time to install the new throttle cable.
6) Intercooler installation-
If using the factory pieces pull the current radiator and lower coolant hose. Drop in the inter/rad assembly, hook up your new lower coolant hose (application- 87-89 Daytona or 88-89 Lebaron GTC with Turbo Intercooled engine) install your lower intercooler hose, slide the fan in, hook the inlet hose to the turbo and connect the airbox hose and your done. (see note below)
The 87-89 Daytona TII intercooler & radiator assembly is a drop in on any 85-88 Lancer, Lebaron, New Yorker, GTS or Reliant. 1985 owners have a coolant nipple in the old radiator- all you have to do is install a "T" in the lower radiator hose to get around this or install a 86-88 water pump housing which has the nipple moved to this location. Shadow owners can also use this setup but will have to fabricate upper brackets. L-body owners will have to move around the lower mounts and fabricate upper brackets and clearance on the alternator will be tight.
If installing a intercooler from another car maker the skies the limit on the different ways they can be installed. See this page for a list of links to cars that have non-stock intercoolers installed in a variety of different ways.
Use good hose clamps, if missing some of the hoses you can always fabricate stuff from exhaust pipe and truck radiator hoses and don't rule out trolling the junkyards for hoses from other applications.
7) Vacuum lines-
You should be able to figure out how to adapt your harness fairly easy.. for those who are having problems.. here is a typical turbo intercooled diagram.
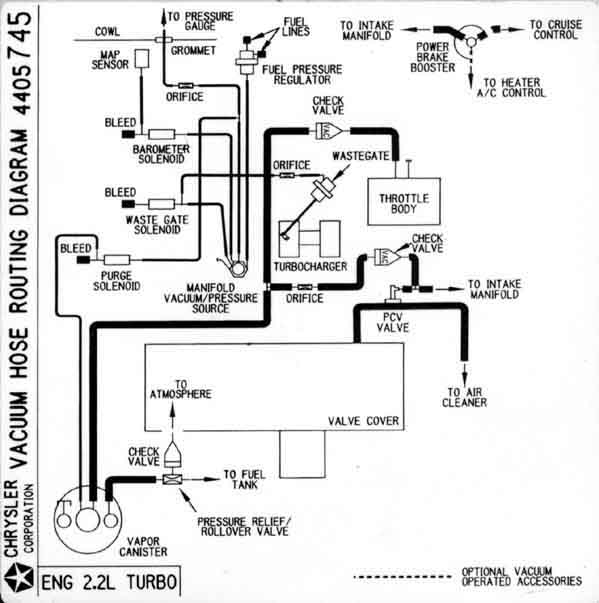
1987 Turbo II Daytona, click for larger image.
A modified diagram, no EGR is listed because no Federal Turbo II cars came with EGR!
The electrical part-
You need to change the L.M. & do a bit of wiring for two reasons- One is to control the larger injectors which are needed with the higher hp applications. The second is the automatic idle speed motor (AIS) is a new 4 wire design which is quite different in operation from the old and crude 2 wire setup.
Which logic module you will be using will depend on your cars wiring. In 1987 Chrysler changed around the pinouts of the logic module in the majority of cars to accommodate external map sensors and ECU controlled cruise control.
86-87 GLHS logic module.
85-87 L-bodies (Charger & Omni), early 87 P-body (Shadow & Sundance), 85-86 Daytona, Lebaron, 400, 600, New Yorker, Lancer & GTS.
87 Daytona, 87 CSX & 87 Shelby Lancer logic module.
Can be used in all 87 vehicles except L-bodies and early P-bodies. Early P-bodies used the 86 wiring and are easy to identify by looking at the logic module. If the map sensor is inside the LM it's a early car that uses GLHS electronics. If the map sensor is under hood, it uses the later Daytona electronics.
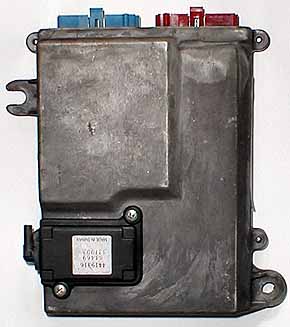
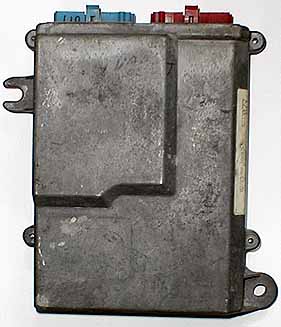
85-86 style logic module on left (note the map sensor) 1987 on right
NOTE: You can use the 87 L.M. in a car that normally would use the 86-87 GLHS module. The problem would be of course that you would have to move around a number of pins in the L.M. connector and wire up an external map sensor. Since there is no real functional reason to do this, I won't cover this subject here.
If searching the junkyards for a Daytona module (I doubt you will find a GLHS module in a junkyard) be aware that Chrysler did sell non-intercooled Shelby z's! If a car was ordered with an automatic transmission it automatically came with the Turbo I engine so that computer is useless to you.
The part number on the 87 Daytona TII computer I have here ends with 171 (I also have one that ends with 077 but have not confirmed it's a TII computer yet) the 87 CSX computer p.n. ends with 079. You can also convert modules over to the calibrations you need if you know someone good with electronics and a prom burner, see this page.
Geoff Allan also does ECU conversions for a modest fee, visit his website at http://www.calgary-web.com/cip/ShelbyZ.html
If no modules can be found you can always purchase the Mopar Performance Stage II modules from your local dealer or Summit Racing for about $120.
86-87 GLHS Stage II = P.N. P5249670
87 Daytona/CSX Stage II = P.N. P5249671
NOTE: I strongly recommend a manual boost controller as each computer is calibrated for just the turbo & wastegate setup as it left the factory. Different turbos, larger exhaust systems and missing vacuum orifices will throw the computer controlled system out of whack and most of the time not work correctly. Grainger it!
Module wiring.
Summary- Run two new wires from the AIS plug to the LM, insert 2 pins into the red LM plug, attach the 2 wires to the new pins, cut off the old 2 wire AIS plug under the hood at the throttle body, attach 2 of the wires from the old plug harness to the new AIS plug and then attach the 2 new underhood wires to the new AIS plug.
Cut off old TPS plug and swap for new style TPS plug.
Clear?
For any reason you feel uncomfortable with doing this wiring there is a company call www.turboelectrics.com that makes conversion harness to make it easier- The even have kits for using the 87 Daytona TII LM for cars that would normally use "GLHS" electronics.
NOTE- The AIS wiring pinouts is the same for both the GLHS and Daytona logic modules, there is still other wiring differences that prevent GLHS modules from being used in cars that would normally use the Daytona modules and vice versa.
Make sure you are using the correct module for your application.
1) Run a electrical taped up pair of wires from AIS area at the throttle body, along the main harness on the rear of the firewall, through the rubber LM grommet in the firewall to a area just above the LM red connector. I'd tie wrap the wires every 3-4 inches or so and follow the factory harness as close as you can. Remember to leave plenty of slack at each end (it's easy to shorten wire, a pain to make it longer) and watch out for any moving parts! It's a pain getting the wiring through the firewall at the grommet- you can route it another way as long extreme care is taken.
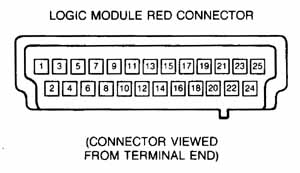
2) Extract 2 pins from the spare LM plug you picked up from a junkyard (I always look for ones with black and purple wires myself, at least light and dark) Let assume your using pins with black and purple wires attached- The black pin will go into location 16, the purple pin will go into location 20. The 87 LM connector has a lock piece which will have to be removed with a small screwdriver before the pins can be inserted. After the pins are installed, reinstall the lock piece and gently tug on the pins to make sure they aren't going to come out. Now solder and tape your new pin/wires to the 2 wires you ran through the firewall (black to black, purple to purple) and the inside part is done.

(close up of AIS/TPS
wiring plug on Relentless)
I left the factory 6 pin socket in place and routed the 2 new wires
alongside.
3) Cutoff the AIS wiring from the old 2 wire AIS connector making sure to leave enough to soldier the new plug on and have the correct length.
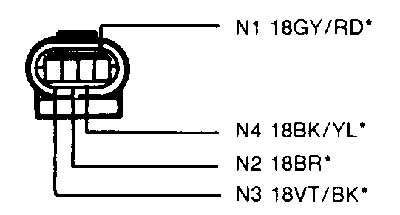
What your going to do is take the 2 wires from the factory harness that went to the old AIS motor (which are brown & gray with a red stripe) and wire them to the new AIS plug as shown. Depending on what year car you stripped the AIS plug from the wiring may or may not accurately reflect the above diagram, I found most of the time it's the same or pretty close. Now take the 2 new wires that you ran and connect them to the 2 remaining pins, the black wire to N4 (black with a yellow stripe) and the purple wire to N3 (violet with a black stripe) solider and tape.
For a full view of the AIS circuit, click here.
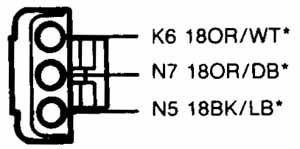
4) Lop off old TPS wiring near old TPS sensor and attach new TPS plug, color code should be the same OR at least the major colors (not the stripes) will match. Again this will depend on what year car you strip the connector from.
NOTE: Some 87 Turbo I engines already have the newer style connector and you will be able to skip this step.
Plug the TPS and AIS connectors in and your done.
3 or 4 wire O2 sensor installation.
A updated 3 or 4 wire O2 sensor isn't needed to run your car with either of these electronics. If your interested in the sensor conversion I will have it covered on another page in the future.